All About Featherstone’s Cut-Flower Bouquet CSA
 

Our Cut-Flower
Bouquet CSA

What is a CSA?

CSA stands for Community Supported Agriculture. Your upfront payment for the Featherstone Bouquet CSA goes a long way in helping our garden buy needed supplies for the coming year. 

What do you get as a member of Featherstone’s Cut-Flower Bouquet CSA?

CSA Members receive a lovely bi-weekly bouquet of locally-grown flowers pre-arranged and packaged in brown paper. Pickup your flowers at one of our two Detroit gardens. (5-total bouquets (weather permitting), picked up every other week for 10 weeks).

Where is the bi-weekly Featherstone Bouquet pickup?

Be sure to select the Eastside Bouquet CSA if you would like to pick up your flowers on Detroit’s East Side (4178 Lakepointe St., MorningSide Detroit), or our Downtown Detroit Bouquet CSA if you would like to pick-up your flowers Downtown (2202 Second Ave. Detroit). Please note that the pickup dates vary depending on the pickup location you choose. 

What flower varieties can you expect in a Featherstone Bouquet?

Featherstone’s cut flower varieties for this year include: amaranth, bachelor buttons, basil, calendula, celosia, chamomile, gomphrena, strawflowers, sunflowers,  wild carrots, zinnias and more!

Why buy local flowers?

Almost 80% of fresh flowers sold in the US are not grown in North America and shipping flowers from other countries incurs additional transportation, energy and storage costs. Additionally, locally grown flowers don’t lose their natural fragrance and color during shipping and can be cut in the morning and in a bouquet that evening, making them truly fresh.  And of course, the production and sale of locally grown flowers contributes to our community’s economy. 


Signup today for
weekly bouquets!


Hello
Warm Turmeric Chickpea & Radicchio Salad w/ Mustard Vinaigrette
 

Warm Turmeric Chickpea & Radicchio Salad w/ Mustard Vinaigrette

Yields: 2-3 servings

Ingredients:

  • 1-2 tablespoon oil of choice (we’re using avocado oil)

  • 1 can (15oz) chickpeas, drained, rinsed, and lightly dried off

  • 1 head of radicchio, torn

  • 2 tablespoons shaved almonds

  • 1 tablespoons coconut aminos (or low sodium soy sauce or tamari)

  • 1/2 teaspoon turmeric

  • 1/2 teaspoon paprika

  • 1/2 teaspoon course ground black pepper

  • 1/4 teaspoon cinnamon

  • 1/4 teaspoon kosher salt (plus more to taste)

  • pinch of red pepper flakes (optional)

Garnishes:

  • 6 scallions, thinly sliced (or 1/2 cup leafy herbs)

  • 2 clementines (or 1 small orange), chopped into small pieces (approx. 1/2”x1/2”)

Directions:

Step 1
In a medium bowl, season the drained, rinsed and dried off chickpeas with all your spices (turmeric, paprika, cinnamon, salt, pepper, and optional red pepper flakes) and stir well to coat evenly.

Step 2
In a large skillet on med-high heat, add 1-2 tablespoons oil, then add spiced chickpeas and sauté until they begin to pop and crisp up, about 6-8 minutes. (To achieve crispier results, avoid over-stirring!). Once chickpeas are lightly crispy and begin to darken in color, turn off the stove, add 2 tablespoons shaved almonds and 1 tablespoon coconut aminos (or low sodium soy sauce) to the hot skillet. Stir until well combined.

Step 3
Tear radicchio into pieces. In a large bowl, toss radicchio with scallions and clementines or oranges (or alternative garnishes of choice), and a couple tablespoons of mustard vinaigrette, (recipe below).

To serve
Divvy out dressed radicchio, scallion and clementine mixture into individual bowls, top each bowl with a few large spoonfuls of warm crispy chickpeas and almonds.


Mustard Vinaigrette

Ingredients:

  • 1/2 cup olive oil

  • 1 lemon, juice & zest

  • 1 tablespoon dijon or grainy mustard

  • 1 clove garlic, grated

  • 1/4 tsp red pepper flakes

  • salt & pepper to taste

Directions:

In a jar, combine all ingredients and shake vigorously. Store in an airtight container in the fridge for 7-10 days.

Enjoy!


Photography, Food Styling, and Recipe Development by Renee Sandoval.

Hello
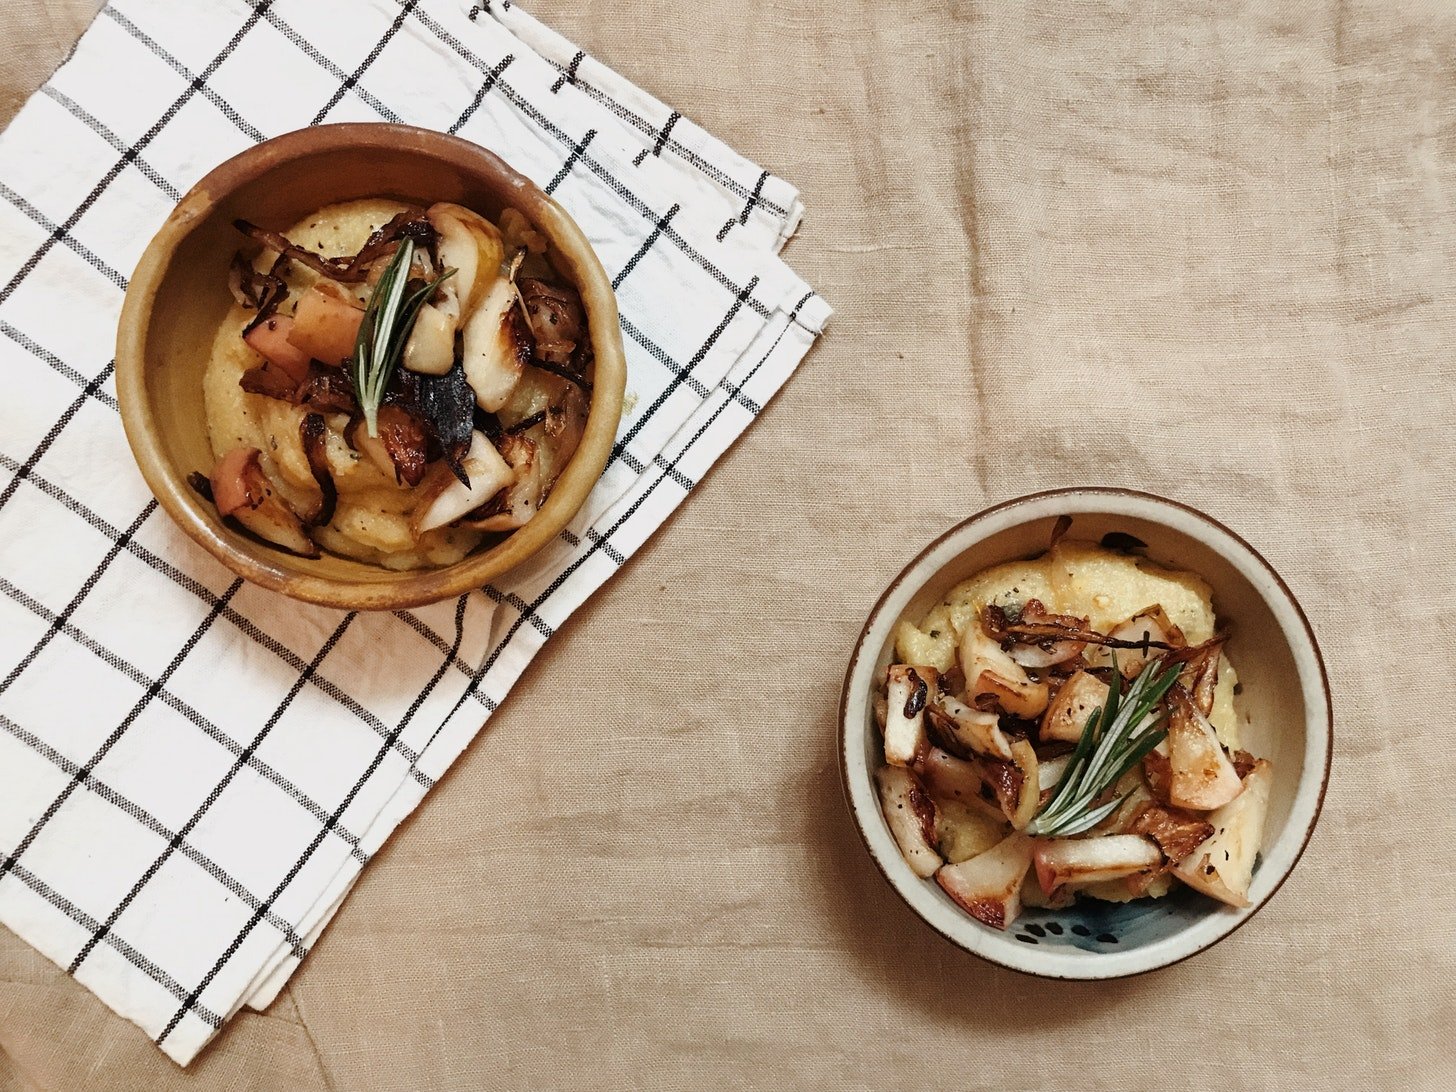
Vegan Rosemary Polenta w/ Caramelized Shallots & Apples
 

Rosemary Polenta w/ Caramelized Shallots & Apples

Looking to add a healthyish side to your holiday feast this week? This creamy (without the cream) Rosemary Polenta is sure to be a crowd pleaser, relatively simple to make, and picturesque. The sautéed apples and caramelized onions provide a delightful balance between sweet and savory, and the rosemary sprig adds a nice aromatic and festive touch.

Recipe notes: Water to polenta ratio is 4:1, (4 parts water, 1 part polenta). Personally, I prefer my polenta on the thinner side, so I usually add an extra 2-4 Tablespoons of liquid. If this is your first time making polenta, I recommend you try out the recipe as is, and make adjustments to suit your preferences from there.

Yields: 2-3 servings

Ingredients:

  • 4 cups vegetable or mushroom broth (plus more if needed)

  • 1 cup polenta 

  • 3-4 tablespoons olive oil (or other oil of choice)

  • 4 shallots or 1 large onion (or 2 small onions), thinly sliced

  • 2 apples (skin on), diced into small (approx.) ½-inch pieces

  • 2 ½ Tablespoons fresh rosemary, chopped

  • 1 teaspoon fresh cracked black pepper (depending on how peppery you prefer your polenta. You can start with 1/2 teaspoon, taste, add more if needed.)

  • 1/2 teaspoon salt, plus more to taste

  • 1/2 teaspoon red pepper flakes (optional)

Directions:

Step 1
In a large skillet or sauté pan over med heat, add olive oil and cook down shallots until tender and translucent (about 5-10 min). Add diced apples and sauté until both apples and onions begin to brown and crisp up (about 12-18 minutes).

Step 2
In a separate pot, bring 4 cups broth to a boil, then add 1 cup polenta, fresh chopped rosemary, pepper, (optional) red pepper flakes and allow to simmer on low heat for 4-5 minutes, stirring frequently to avoid clumps. Taste, and add more salt and pepper if needed. 

Side note: If the polenta starts to get too thick, add more liquid (broth or water) and a splash of oil until you achieve your preferred consistency. I usually add a few extra tablespoons of broth.

Step 3
Divvy out rosemary polenta into individual bowls, spoon the sautéed apples & onions on top, garnish with a rosemary sprig. And there you have it— a perfect warming side dish for your holiday feast.

Enjoy!

–––
Watch our new cooking demo! 
Click here to watch the making of this recipe via Instagram Reels. 


Photography, Recipe Development, and Writing by Renee Sandoval

autumn recipeHellosavory, recipe
Mushroom Congee w/ Pea Shoots
 

Mushroom Congee w/ Pea Shoots

Yields: 4

Ingredients:

  • 3/4 cup sushi rice

  • 2.5 liters (10 cups) mushroom broth (or your choice of broth/stock)

  • 8-12 oz mushrooms, thinly sliced

  • 1 tablespoon sunflower oil (or oil of choice)

  • scallion stems, thinly sliced

  • pea shoots (or assorted microgreens of choice)

  • salt to taste

  • soy sauce

Garnishes:

  • chili crisp

  • sesame oil

Directions:

Directions:

Step 1
In a large pot on the stove, add rice and broth and bring to a boil. Give the rice a good stir once it begins to boil, then turn heat down to a low simmer and half-cover with a lid. Simmer gently for 1.5-2 hours, stirring every 15-20 minutes to prevent rice from sticking to the bottom of the pan. The ending result should be thick, oatmeal or porridge-like consistency. Add salt to taste.

Side note: Depending on the broth you chose, you may need less or more salt. Allow your tastebuds to be your guiding light!

Step 2
In a med-large skillet on the stovetop, heat 1 tablespoon of oil. Add sliced mushrooms and sauté until crisp and lightly brown.

Cooking tip: The best way to achieve crispy, browned mushrooms is to sauté on medium heat avoid over-stirring your mushrooms.

To Serve
Divvy congee up into bowls and top each bowl with a sprinkling of thinly sliced green onions, a small spoonful of soy sauce, chili crisp, 1/2 teaspoon of sesame oil, and a small handful of Featherstone pea shoots, or an assortment of your favorite type of microgreens.

Enjoy!


Photography & Food Styling by Renee Sandoval. Recipe by Fuchsia Dunlop.

Hello
Vegan Collard Greens w/ Black Eyed Peas & Jalapeño Cornbread
 

Vegan Collard Greens w/ Black Eyed Peas & Jalapeño Cornbread

One of my favorite go-to recipes during the winter months is this collard greens dish. This dish keeps in freezer very well because the collards are hearty enough to stay in good shape when reheating. I typically make a large batch on a Sunday evening, freeze half and enjoy the remaining half throughout the week. I used to make this dish with bacon, but found that it can be just as delicious (and healthier) by using a rich mushroom broth and black eyed peas for protein. Definitely add bacon for a heartier, more traditional style of collards. (Try this recipe for a more authentic version).

Yields: 4-6 servings

Ingredients:

  • 1 bunch collard greens, rinsed and torn

  • 1 onion or 2-3 shallots, thinly sliced

  • 2-3 cloves garlic, chopped

  • 1 (15oz) can black eyed peas

  • 2 tablespoons olive oil (or other oil of choice)

  • 2 tablespoons tomato paste

  • 4 cups mushroom broth (or other broth of choice) (plus more water and/or broth as needed)

  • 1 dried red pepper or 1 tsp red pepper flakes (optional)

  • salt & pepper to taste

  • 1 lemon, juiced (tip: if you’re making the cornbread, reserve 1 Tbsp of lemon juice for the batter)

Directions:

Step 1
In a large pot on med-low heat, add olive oil, onion, garlic, and a pinch of salt. Sauté until onions are translucent and slightly browned (about 6-8 minuets). Stir in tomato paste and let it cook down with the onions/garlic for a few minutes, until the red deepens in color (about 2-3 min).

Step 2
Add 4 cups broth (plus more water and/or broth as needed), collards (torn into smallish pieces to make your eating experience more enjoyable and less messy), dried red pepper or red pepper flakes. Turn up heat and bring pot to a boil. Stir well, then turn down to a low simmer, cover with lid and cook for 40-50 minutes. (Giving you enough time to make your cornbread! 👏🏼)

Step 3
Once your collards are cooked through and tender, add can of black eyed peas and simmer for a few more minutes. Turn off the stove, squeeze in lemon juice, and stir well. Add salt & black pepper to taste if needed.


Jalapeño Cornbread (dairy free)

This modified cornbread recipe was adapted from the OG Moosewood Cookbook. Their version calls for 1 cup of buttermilk, but because I’m dairy intolerant, I have a dairy-free buttermilk hack to share with you(!): buttermilk contains higher amounts of lactic acid which adds a tangy/sourness that regular milk lacks. To re-create that, I’m adding 1 tablespoon of lemon juice (or vinegar) per 1 cup of alt-milk (I’m using oat milk) to achieve a buttermilk-like substitute. Additionally, to give it a subtle kick, I’m adding a jalapeño harvested from our garden

Yields: 8x8-inch pan of cornbread

Ingredients:

  • 1 cup all-purpose flour

  • 1 cup yellow corn starch

  • 1 cup oat milk (or alt-dairy milk of choice)

  • 1 tablespoon lemon juice

  • 1 egg

  • 1-2 jalapeños, finely chopped (1= tame ; 2= a palpable kick)

  • 3 tablespoons butter, melted

  • 1/4 cup honey

  • 2 teaspoons baking powder

  • 1/2 teaspoon baking soda

  • 1/2 teaspoon salt

Directions:

Step 1
Preheat oven to 425°F, and grease a 8x8-inch pan.

Step 2
In a small bowl, beat together egg, oat milk, lemon juice, and honey.
In a larger separate bowl, mix together dry ingredients.

Step 3
Combine all ingredients together in the large bowl, including butter and chopped jalapeño, and mix well.

Step 4
Spread batter into your prepared pan and bake for 20 minutes, or until a toothpick comes out clean. Garnish with honey drizzle + pat of butter, serve warm.

Enjoy!


Photography, Food Styling, and Recipe Development by Renee Sandoval & (for the cornbread—Moosewood)

autumn recipeHello
Roasted Squash, Pepper & Sweet Potato Bisque w/ Crispy Cabbage
 

Roasted Squash, Pepper & Sweet Potato Bisque w/ Crispy Cabbage

By Renee S.

For this recipe, I’m using squash, sweet potatoes and peppers because that’s what I had in my fridge. If you want to simplify the ingredients list, you can do a combined 3 lbs. of squash and sweet potatoes and leave out the peppers. It will be just as good and eliminate an extra step.

Prep note: This soup is meant to be an ultra creamy bisque, which requires a quality/high powered blender. I’m using this blendtec, which I highly recommend for anyone looking to invest in a high-quality and versatile blender.

Yields: Approx. 3 quarts

Ingredients:

  • 1 lb. butternut squash (about 1 squash), cut in half lengthwise and seeds scooped out

  • 1 lb. sweet potatoes (about 2-3 smallish potatoes), peeled and cut in half lengthwise

  • 1 lb. assorted peppers, cut in strips with seeds removed

  • 1/2 of a head of cabbage (I’m using purple, but go with your color of choice), cut in approx. 1/2-inch thick slices

  • 1 can (14oz.) full fat coconut milk

  • 4-5 cups of water (depending on how thick you like your soup)

  • 1 large onion, thinly sliced

  • 3 cloves garlic, chopped

  • olive oil (or other oil of choice)

  • 1 tablespoon of butter (or sub coconut oil for vegan soup)

  • 1 tablespoon fresh rosemary

  • 3 tablespoons brown sugar

  • 2 tablespoons ground curry

  • 1 tablespoon cumin

  • 2 teaspoon cinnamon

  • 1 teaspoon cardamom

  • 1/4 teaspoon cayenne pepper

  • 1 teaspoon of salt, plus more to taste

Garnish suggestions:

  • toasted pepita seeds (try toasting them in oil on the stove top for a few minutes, until lightly browned. My favorite is toasting in truffle olive oil.)

  • microgreens

Directions:

Step 1
Preheat oven to 425ºF. Peel sweet potatoes and cut in half lengthwise; cut butternut squash in half lengthwise and scoop out seeds (keep skin on). Evenly coat the sweet potatoes and squash with olive oil (about 2 tablespoon, or more if necessary), sprinkle generously with sea salt and pepper, place cut-side down on a baking sheet and bake for 50 minutes.

After putting your sweet pots & squash in the oven, cut your peppers into strips with seeds removed. In a bowl, drizzle about 1 tablespoon of olive oil on peppers and toss to coat evenly, season generously with salt and pepper (at least 1/2 teaspoon of salt and 1/4 teaspoon pepper). Set aside this pan until you have 30 minutes left on your kitchen timer, then place on the bottom rack.

Step 2
In a large pot on medium-high, heat up 1 tablespoon butter (or coconut oil for vegan), onions and garlic, season with salt & pepper (about 1 teaspoon salt and 1/2 teaspoon pepper), cook until translucent and slightly caramelized (about 6-8 minutes). Once onions and garlic are soft and deepen in color, add coconut milk, 4 cups water, brown sugar and spices (curry, cumin, cinnamon, cardamom, cayenne). Bring to a light boil, then turn down and simmer for at least 20 minutes. (Tip: remember, this base will be blended with all the veggies so the flavor will be robust, and that’s how it should be!)

Step 3
Once your veggies are finished roasting and your coconut broth is done simmering, allow everything to cool down before blending so it’s easier to handle. Once cooled down, remove the skin from butternut squash, then cut squash and potatoes into smaller chunks. Depending on the size of your blender, you’ll most likely need to blend in batches. While blending each batch: taste, and add more salt, pepper, and/or spices to suit your preferences, and add more water if the consistency seems too thick. I added an additional 1-2 cups of water while blending.

Step 4
Pan-fry your cabbage: Cut head of cabbage in (approx.) 1/2” thick slices (about 2 round slices per serving). In a large cast iron skillet or heavy bottomed pan, heat up about 2 tablespoons olive oil. Once hot, place cabbage down, season with salt & pepper and allow it to cook, undisturbed, for about 6-8 minutes on each side on medium heat. It should be crispy and caramelized on the outsides, and tender on the inside.

To Serve
Sprinkle a spoonful of toasted pepita seeds and/or Featherstone microgreens(!) on top of your soup & serve with a side of crispy, tender cabbage for a warming and satiating meal.

Enjoy!

This recipe was originally published on Renee’s Woodbine Street Kitchen newsletter. Subscribe here for more seasonal recipe content.


Photography, Food Styling, and Recipe Development by Renee Sandoval.

Wild Mushroom + Fennel Flatbread w/ Fresh Oregano
 

Mushroom Fennel Flatbread w/ Fresh Oregano

Yields: 2-3 servings

Ingredients:

  • pastry dough (checkout this recipe for homemade pastry dough on Renee’s newsletter, or use store bought dough if you’re pressed for time)

  • 10-12 oz wild mushrooms

  • 1 fennel bulb

  • 1/4 cup olive oil

  • 2 tablespoons balsamic

  • 2-3 tablespoons chopped fresh oregano, plus more for garnish (or other choice of herbs)

  • 2 cloves garlic

  • 1/2 teaspoon red pepper flakes

  • 1/2-1 teaspoon course salt

  • 1/2 teaspoon ground black pepper

Directions:

Step 1
Place a tinfoil lined baking sheet in the oven and preheat to 425°F. (The reason for this step is to ensure your pan heats up evenly, and you’ll achieve crispier veggies because they start to cook as soon as you place them down.) To cut the fennel: chop off the fennel fronds and the dried root at the end of the bulb. Cut bulb in half, then slice thinly, widthwise (here’s a helpful video). Chop your mushrooms, garlic, and oregano. Place all the chopped veggies and herbs into a large bowl and toss in the olive oil, balsamic, red pepper flakes, salt & pepper.

Step 2
Remove the baking sheet from the oven and place your mushroom-fennel mixture on the baking sheet; try to avoid overcrowding the pan too much. Bake for 25-30 minutes. Then take out and allow to cool down while you roll out your pastry dough.

Step 3
Increase the oven to 450°F. Roll out your pastry dough on a lightly floured surface. Add a 1/2 teaspoon of olive oil, then distribute the mushroom-fennel mix evenly on top of the flatbread. Slightly pinch up the edges of the dough to ensure the mushroom mixture won’t spill out. Bake until the edges are golden brown, about 10-12 minutes. Drizzle a touch of olive oil and balsamic on top & serve.

Enjoy!


Photography, Food Styling, and Recipe Development by Renee Sandoval

Spiced Sweet Potato, Kale + Farro Tacos
 

Spiced Sweet Potato, Kale + Farro Tacos

Yields: 2-3 servings

Ingredients:

  • 1 cup dried farro

  • 2 cups vegetable or mushroom broth (or salted water if you don’t have broth)

  • 1-2 sweet potatoes, cut in small-medium chunks (skin on or off is fine, but potatoes will bake quicker without the skins!)

  • 1/2 of a bunch of kale, massaged and torn (about 2-3 cups)

  • olive oil (1 tablespoon per potato)

  • 2-3 scallions, chopped

  • 1 radish, thinly sliced

  • 1/4 cup fresh dill or cilantro

  • 1 tablespoon cumin

  • 1 tablespoon curry

  • 1/2 tablespoon brown sugar

  • 1/2 salt (plus more to taste)

  • 1/4 teaspoon cracked black pepper (plus more to taste)

  • 4-6 tortillas

Garnish suggs:

  • chopped purple slaw

  • shaved toasted almonds

  • avocado slices

Directions:

Step 1: Cook the farro
Add 2 cups broth + 1 cup dried farro into a large pot, stir. Bring to boil, then cover and turn down to low heat and simmer for 8-12 minutes, then stir and continue to simmer for another 5-8 minutes with lid off to reduce some of the liquid. Take off heat, and cover with lid until tender (up to 15 min.). Stir and fluff, then set aside. (Note: This is a general way to cook the farro we use at home. If your farro package includes directions, we encourage you to follow those because there are varieties of farro that require slightly different cook times.)

Step 2: Bake potatoes
Pre heat oven to 425ºF. Peel sweet potatoes and cut into small chunks, (note: I peel skins off for a quicker bake time. If you leave skins on, you may need to allow potatoes to roast for an additional 10 minutes or so). Drizzle olive oil over the potatoes, add salt, cumin, curry, brown sugar, and pepper. Bake for 30-45 minutes, until soft, slightly browned, and easy to pierce through with a fork.

Step 3: Prep veggies & combine ingredients
Rinse and tear kale into small pieces. Massage the kale for 6-8 minutes (I keep track by listening to 2 full songs). This is an important step! Massaging the kale breaks down the tough fibrous and allows for easier digestion. (Note: some people like to massage with olive oil and/or citrus, salt and/or pepper, but I typically massage the kale prior to adding anything to keep my hands clean.)

In a large bowl, combine the warm farro, sweet potato, and kale. Add more salt, pepper or spices if needed. Thinly slice the radish, chop the scallions, and de-steam and tear the dill or cilantro.

Step 4: Assemble & Serve
Heat flour or corn tortillas in a toaster oven or on the stovetop until warmed, then layer up your tortillas with your farro-kale-sweet potato mix, top with sliced radish, herbs, (optional) crunchy toppers, and serve with your favorite hot sauce.


Photography, Food Styling, and Recipe Development by Renee Sandoval

autumn recipeHellosavory, recipe
Sticky Spicy Green Beans & Jasmine Rice
 

Sticky Spicy Green Beans & Jasmine Rice

Yields: 8oz sauce & 2 cups rice

Ingredients:

  • 1 cup uncooked jasmine rice

  • 1 1/2 cups water (for rice)

  • 1 tsp coconut oil

  • 1 cup water (for sauce)

  • 1/3 cup soy sauce or tamari

  • 1/2 cup brown sugar

  • 1 vegetable bouillon cube

  • 2 tsp Sambal Oelek Chili Garlic Paste

  • 1 Tbsp red pepper flakes

  • 6 cups green beans (or noodle beans) cut into 2-3 inch pieces

Garnishes:

  • 1 cup quartered fresh tomatoes

  • 1 tsp sesame seeds

Directions:

Step 1
For the jasmine rice: On the stovetop, add 1 cup rice, 1 1/2 cups water, and 1 tsp coconut oil to a medium pot. Once the water comes to a rolling boil, turn heat to low and cover with lid. Allow rice to simmer for about 25-30 minutes, or until water is fully absorbed.

Step 2
For the green beans: Steam green beans for 10-15 minutes or until desired doneness (we prefer slightly firmer beans). Then, make your sticky sauce while steaming your beans!

Step 3
For the sauce: In a small/medium pot on the stove, combine 1 cup water, soy sauce or tamari, brown sugar, and bullion cube; bring to a boil on medium heat and whisk frequently to prevent brown sugar from burning.
Allow the sauce to cook down for about 15 minutes or until sticky bubbles reach a rolling boil, turn off the heat and stir in red pepper flakes and Sambal Garlic Chili Paste.

Step 4
Toss your steamed green beans in the sauce and serve over a bed of rice. Add raw, fresh tomatoes to the bowl and sprinkle sesame seeds on top of the beans.

Suggested garnish: Add fresh chopped basil or cilantro on top.

Enjoy!


Photography, Food Styling, and Recipe Development by Annie Hakim

summer recipeHellosavory, recipe
Miso Sesame Turmeric Granola
 

Miso Sesame Turmeric Granola

Yields: about 6 cups

Ingredients:

  • 3 cups old fashion oats

  • 1 cup raw cashews

  • 1/2 cup almonds

  • 3 tablespoons black sesame seeds

  • 3 tablespoons pumpkin seeds

  • 2 tablespoons flax seed

  • 2 teaspoons ground turmeric

  • 1 teaspoons cinnamon

  • 1/2 teaspoons all spice

  • 1/2 teaspoons cardamom

  • 1/4 teaspoons cracked black pepper

  • 1/4 teaspoons course ground sea salt

  • 1/4 cup apple juice

  • 3 tablespoons grade A maple syrup

  • 2 tablespoons melted coconut oil

  • 1 tablespoons date syrup

  • 3 teaspoons miso paste (white)

  • 1 teaspoons sesame oil

  • 1 teaspoons vanilla extract

Additions After Baking:

  • 3/4 cup dried fruit (I’m using dried cherries and mulberries)

  • 1/4 cup chocolate chunks or chips

Directions:

Step 1

Preheat oven to 325°F.
In a large bowl, combine 1 cup of oats, 1 cup of nuts, all of the seeds, spices, salt & pepper. In a blender or food processor, lightly pulse the remaining 1 cup oats and 1 cup nuts. (Note: I think it’s nice to have a combination of lightly chopped nuts and ground up oats because it helps coat the wet ingredients to the larger chucks, but you can skip this step if you don’t have a blender/food processor.)

Step 2
In separate medium bowl, whisk together all of the wet ingredients: melted coconut oil, apple juice, maple syrup, date syrup, miso, sesame oil, and vanilla extract. Pour the wet ingredients over the dry mix, using a spatula to incorporate all of the ingredients together. Now this is where your trusty taste buds come in: taste to make sure the mixture is to your liking. I personally prefer a not-so-sweet granola, but add a tablespoon or two of brown sugar if you like a sweet mix.

Step 3
On a parchment paper lined pan, spread out the granola mixture evenly. Bake for 35-40 minutes (until slightly golden). While it’s in the oven, stir the mix around once or twice (I do this every 15 minutes) so that it bakes evenly.

Step 4
After the granola mixture is cooled down completely, add 1 cup of your favorite combination of dried fruits and chocolate. I used 1/4 cup of dried cherries, 1/4 cup of dried mulberries, and 1/2 cup of chocolate chunks.

Serving suggestion: Create your own parfait at home by layering yogurt, fresh berries, and granola in a small mason jar—top with homemade whipped cream if you’re feeling decadent. Or keep it simple by tossing a handful of granola into your favorite yogurt cup.


Photography, Food Styling, and Recipe Development by Renee Sandoval

breakfastHellosweet, recipe
Chia Seed Yogurt w/ Seasonal Fruit
 

Chia Seed Yogurt w/ Seasonal Fruit

Yields: 1 serving (we suggest serving in a 6-ounce glass jar)

Do ahead: Make your chia pudding ahead of time by adding 2 tablespoons chia seeds and a 1/2 cup of milk of choice (I’m using Oatly) into a jar. Stir well; then allow to sit for 20-30 minutes, until the chia seeds have absorbed the milk to make a pudding-like consistency. (Note: you won’t need all of the chia pudding for 1 serving, so you can save the remainder in the fridge for later.)

Ingredients:

  • coconut yogurt

  • chia pudding

  • berry jam or preserves of choice

  • peanut butter

  • fresh seasonal berries

Directions:

Layer the jar however you wish. I began with a bottom layer of a few tablespoons of coconut yogurt followed by 1 tablespoon of peanut butter, more yogurt, berry jam, chia pudding, then topped with fresh cut strawberries. We suggestion adding whatever fruits are in season, or using up what you have in your fridge.


Photography, Food Styling, and Recipe Development by Renee S.

breakfastHellosweet, recipe
Vegan Three Bean Pepper Salad
 

Three Bean & Pepper Quinoa Salad

Yields: 6-8 servings

Ingredients:

  • a variety of 3 (15oz) cans of beans (I’m using cannellini, habichuelas, and garbanzo beans)

  • 2 peppers, coarsely chopped (I’m using 1 red pepper & 1 poblano pepper)

  • 2 cups cooked & drained quinoa

  • 1 small cucumber, chopped

  • 1 cup cherry tomatoes, halved

  • 1/2 cup red onion, chopped

  • 1/3 cup of raisins or coarsely chopped dates

  • 1 tablespoon olive oil

  • 1 tablespoon maple syrup, (alternatives: date syrup, honey, agave)

  • 1 teaspoon cinnamon

  • 1 lime, zest & juice

  • 1/2 cup fresh cilantro, chopped

  • 1/2 cup fresh mint, chopped

  • salt & pepper to taste

Garnish suggestions:

  • avocado slices

  • shaved almonds

  • sliced mango

Directions:

In a large bowl, combine all ingredients and stir well. Store in fridge and enjoy within a week.


Photography, Food Styling, and Recipe Development by Renee Sandoval.